
1. Introduction
When you decide to Build a Budget Crypto Mining Rig, you’re creating a cost-effective engine that transforms PC components into a 24/7 digital asset farm. Rather than spending thousands on commercial setups, you can achieve robust hash rates with a rig under $1,500. Over the past year, I’ve built three such rigs in my home workshop—fine-tuning hardware and cooling to maximize hash-per-watt. This step-by-step guide covers each phase: choosing GPUs, power supplies, and motherboards; assembling your frame; configuring BIOS; installing and tuning mining software; and optimizing performance. You’ll see three illustrative images marking key stages, alongside our crypto mining profitability guide, an Investopedia mining overview. By following these instructions, you can Build a Budget Crypto Mining Rig that runs reliably and earns digital rewards.
2. Understanding Crypto Mining and Hardware Essentials
2.1 What Is Crypto Mining?
Crypto mining is the process of validating transactions on a proof-of-work blockchain by solving cryptographic puzzles. Miners deploy computational power—typically via GPUs (graphics processing units)—to hash data and compete to append new blocks. Successful miners receive block rewards and transaction fees, paid in the network’s native coin. Understanding the underlying algorithm (e.g., Ethash for Ethereum Classic, Equihash for Zcash) helps you optimize hardware choices and software configurations. Learning how to Build a Budget Crypto Mining Rig begins with grasping how hash rates translate into potential earnings and how difficulty adjustments affect profitability.
2.2 Essential Components for Your Rig
A balanced mining rig combines several key parts:
Motherboard: Opt for models with multiple PCI-E slots (6+), such as ASRock H110 Pro BTC+.
GPUs: Budget-friendly options like NVIDIA GTX 1660 Super or used AMD RX 580 deliver solid hash rates under $200.
Power Supply (PSU): Select an 80+ Gold-rated PSU with 20–30% headroom above total GPU wattage.
CPU & RAM: A basic Intel Celeron or AMD Athlon with 4–8 GB RAM suffices, since mining is GPU-centric.
Storage: A simple 120 GB SSD hosts the OS and mining software.
Frame & Risers: An open-air frame with PCI-E riser kits ensures adequate airflow and GPU spacing.
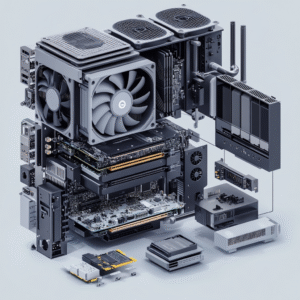
These essentials form the foundation as you Build a Budget Crypto Mining Rig that maximizes hashing power per dollar without unnecessary extras.
3. Selecting Cost-Effective Hardware
When you set out to Build a Budget Crypto Mining Rig, optimizing cost-efficiency is paramount. Rather than purchasing the latest flagship GPUs, focus on components that deliver the highest hash rates for the lowest outlay. The goal is to maximize your rig’s earning potential per dollar spent, ensuring your upfront investment pays off quickly.
3.1 Evaluating Hash-Per-Dollar Metrics
Before buying any GPU, calculate its hash-per-dollar ratio: divide the card’s expected hash rate (e.g., 30 MH/s) by its current market price. Use profitability calculators (WhatToMine or our mining profitability guide) to project daily earnings. Prioritize cards with ratios above your break-even threshold—these yield faster ROI and help you Build a Budget Crypto Mining Rig without overspending on marginal performance gains.
3.2 Procuring Used and Refurbished Components
Secondary markets often hide bargains. Search eBay, Facebook Marketplace, or local classifieds for lightly used GPUs from gamers upgrading their rigs. Verify seller reputations and request proof of performance (screenshots of recent hash rates). Refurbished units from reputable retailers can carry warranties, reducing risk. By sourcing pre-owned parts, you can allocate more of your budget to additional GPUs—key to scaling your hash rate while you Build a Budget Crypto Mining Rig.
3.3 Leveraging Bulk Purchases and Bundle Deals
Join mining and hardware forums (Reddit’s r/EtherMining, Bitcointalk) to find group buys on riser kits, frames, and PSUs. Distributors sometimes offer bundle discounts on motherboard-plus-CPU packages ideal for mining. Pool orders with fellow miners to unlock volume pricing, reducing per-unit cost by 10–20%. These collective efforts let you pocket savings that directly enhance your rig’s profitability and make your plan to Build a Budget Crypto Mining Rig more attainable.
4. Preparing Your Workspace and Tools
A well-prepared workspace accelerates assembly and prevents costly mistakes when you Build a Budget Crypto Mining Rig. Proper environment setup ensures component safety, efficient workflow, and effective troubleshooting.
4.1 Ensuring Electrostatic Discharge (ESD) Protection
Static electricity can destroy delicate PC parts instantly. Equip your bench with an anti-static mat and wear an ESD wrist strap grounded to your power supply. Handle GPUs, motherboards, and memory modules by their edges, avoiding contact with circuitry. Investing in ESD protection is a small cost that safeguards your hardware and makes building your budget rig risk-free.
4.2 Organizing Your Workspace Layout
Allocate a clean, flat surface—ideally a sturdy table—near adequate ventilation. Arrange tools and components logically:
Keep the motherboard on its anti-static pad.
Group GPUs, risers, and power cables in separate trays.
Label each riser cable to match its PCI-E slot.
Clear separation prevents mix-ups and speeds assembly. Position a small exhaust fan or open window nearby to dissipate heat during testing, setting the stage for a smooth build.
4.3 Assembling Essential Tools and Accessories
Gather the following before you start:
A set of magnetic-tip screwdrivers (Phillips and flathead).
Cable ties and Velcro straps for tidy wiring.
Compressed air can and soft brush for dust removal.
Flashlight or headlamp for illuminating tight spaces.
A surge-protected power strip or UPS for safe first power-on tests.
With your workspace optimized and tools at hand, you’ll streamline every step as you Build a Budget Crypto Mining Rig—minimizing errors and maximizing efficiency from the very first screw to the final power-up.
5. Step-by-Step Assembly Guide
Follow this sequence to assemble your rig:
Install CPU, RAM, and SSD: Place the CPU in its socket, clip RAM into slots, and secure the SSD in a drive bay.
Mount Motherboard on Frame: Use standoffs to prevent shorts; align rear I/O with frame opening.
Attach Risers and GPUs: Connect PCI-E risers to slots, seat GPUs, and fasten them to the frame.
Wire Power Connections: Plug the 24-pin ATX and 8-pin CPU connectors, then link each GPU to the PSU via 6+2 pin cables.
Cable Tidy: Bundle excess wires away from airflow paths.
Initial Power-On Test: Boot the system without GPUs to enter BIOS; then add GPUs one at a time to confirm detection.
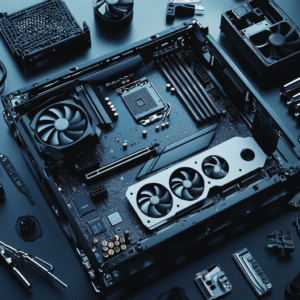
Completing these steps lets you Build a Budget Crypto Mining Rig that boots reliably and is ready for software setup.
6. BIOS Configuration and Driver Installation
Optimizing BIOS ensures stability and unlocks full GPU potential:
Enable 4G Decoding: Required for >4 GPUs.
Set PCI-E to Gen2 or Gen1: Improves compatibility with older risers.
Disable Unused Onboard Devices: Audio, serial ports, and SATA controllers free up resources.
Adjust CPU Settings: Lower min CPU frequency to reduce idle power draw.
Save changes and reboot into your operating system (Windows or Linux). Install official GPU drivers—NVIDIA GeForce or AMD Radeon—and confirm detection via Device Manager or lspci. Proper drivers are essential to Build a Budget Crypto Mining Rig that operates without crashes or hash-rate drops.
7. Mining Software Setup and Configuration
Choosing and configuring the right mining software can make or break your ability to Build a Budget Crypto Mining Rig that runs smoothly and earns consistently. Rather than wrestling with raw command‐line scripts, consider using a purpose-built management platform:
7.1 Deploying a Mining OS
A specialized Linux distribution like HiveOS or RaveOS simplifies setup by packaging drivers and miner applications into a single image. Download the ISO from the official site (e.g., HiveOS), then flash it to a USB drive using a tool like Rufus. Boot your rig from that USB, and it will automatically connect to the cloud dashboard.
7.2 Configuring Wallets and Pools
Once in the dashboard, create a “Farm” and add your wallet(s) under Farm → Config. Paste your crypto address and assign a worker name. Next, select your target coin—Ethereum Classic, Ravencoin, etc.—and enter the pool URL and port. HiveOS offers presets for major pools, eliminating typos and connection headaches.
7.3 Selecting and Tuning Mining Apps
Within the web interface, choose from integrated miners (T-Rex, TeamRedMiner, Gminer). Each app lets you tweak key parameters—intensity, power limits, temperature thresholds—via a simple GUI. Adjust these settings to balance hash rate and power draw, then save your flight sheet.
7.4 Windows Alternatives
If you prefer Windows, GUIs like MSI Afterburner paired with multi-GPU mining apps (PhoenixMiner GUI, CryptoDredge GUI) allow you to configure pools, wallets, fan curves, and overclock/undervolt settings without editing text files. Just enter your pool address, wallet, and worker name into the fields provided.
7.5 Verifying Your Setup
After configuration, monitor each GPU’s hash rate and temperature in real time. A healthy rig shows stable hash rates within manufacturer specifications (e.g., 25–30 MH/s per GTX 1660 Super) and GPU temps under 65 °C. If a card underperforms or drops off, check its riser connection, power cable, or driver version.
By using a management platform or straightforward GUIs instead of command-line scripts, you’ll streamline the process every time you Build a Budget Crypto Mining Rig—making setup faster, maintenance easier, and scaling to multiple rigs far more manageable.
8. Optimization and Troubleshooting
Fine-tune performance and resolve issues:
Undervolting & Overclocking: Use MSI Afterburner or AMD WattMan to lower power limit by 20–30% and increase core/memory clocks by 50–100 MHz.
Temperature Control: Maintain GPU temps below 65 °C; adjust fan curves for efficient cooling.
Remote Monitoring: Deploy HiveOS or Awesome Miner dashboards for real-time hash rate, temperature, and uptime metrics.
Troubleshooting: If a GPU goes offline, reseat risers and cables; test each card individually to pinpoint faults.
These optimization strategies ensure your ability to Build a Budget Crypto Mining Rig that maximizes hash-per-watt and runs stably over time.
9. Profitability Analysis and ROI Projections
Calculate returns by factoring in:
Total Hash Rate: Sum of all GPU outputs (e.g., 6 × 30 MH/s = 180 MH/s).
Power Draw: Total system wattage × electricity cost (e.g., 800 W at $0.10/kWh).
Network Difficulty & Rewards: Use WhatToMine or similar tools.
Pool Fees: Typically 1–2%; subtract from gross earnings.
For example, a 180 MH/s rig consuming 800 W might earn $10/day in Ethereum Classic, netting $300/month before power costs. At a $1,200 build cost, payback occurs in roughly four months. Armed with these insights, you confirm whether to Build a Budget Crypto Mining Rig or adjust component choices.
Recurso Adicional de Investimento
If you are studying how to invest safely in this market, I recommend this e-book containing the main cryptocurrencies with enormous potential for appreciation in the next bullish cycle, based on their market value, asset price, historical maximum and training team.
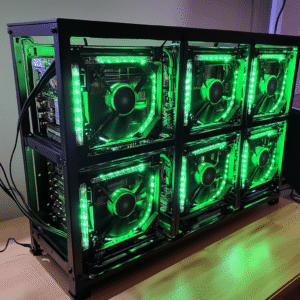
10. Maintenance, Safety, and Cooling
Long-term success depends on proper care:
Monthly Cleaning: Remove dust from fans and heatsinks using compressed air.
Surge Protection: Use a UPS to guard against power interruptions and spikes.
Fire Safety: Place the rig on a non-flammable surface and avoid cable clutter.
Software Updates: Keep mining software and drivers current to benefit from performance patches.
Maintain logs of daily hash rates, temperatures, and uptime to spot trends or emerging faults. Diligent upkeep ensures your efforts to Build a Budget Crypto Mining Rig remain profitable and secure.
11. Conclusion
Learning to Build a Budget Crypto Mining Rig empowers you to transform standard PC parts into a continuous digital asset generator. By carefully selecting cost-effective hardware, following a systematic assembly guide, configuring BIOS settings, and optimizing software and cooling, you achieve a reliable rig capable of steady earnings. Profitability analysis confirms your investment makes sense, while regular maintenance preserves performance and safety. With this comprehensive, step-by-step setup, you can enter the mining space without a massive budget and reap rewards from decentralized networks around the clock.
12. FAQ
Q1: Which GPUs offer the best value for a budget mining rig?
Mid-range cards like the NVIDIA GTX 1660 Super or AMD RX 580 strike an excellent balance between upfront cost (often under $200 used) and hash rate (≥ 25 MH/s), making them ideal for rigs under $1 500.
Q2: How much electricity will my rig consume, and how do I calculate running costs?
A six-GPU setup typically draws between 700 W and 900 W. Multiply that by your local rate (e.g., $0.10 /kWh) and by 24 hours to estimate daily power expenses. Use our mining profitability guide to plug in your figures.
Q3: Which cryptocurrency should I mine with a GPU rig?
Choose based on your hardware’s efficiency: GPUs excel at Ethash-based coins (Ethereum Classic, etc.), Equihash (Zcash), or RandomX (Monero). Check real-time stats on WhatToMine.
Q4: How often and how should I perform maintenance on my mining rig?
Perform monthly dust cleaning with compressed air, quarterly BIOS and software updates, and monitor GPU temperatures to keep them below 65 °C. Regular inspections prevent heat buildup and ensure consistent hash rates.
Q5: What safety precautions should I take when running a mining rig?
Always use a surge protector or UPS to guard against power spikes, place the rig on a non-flammable surface, secure loose cables, and maintain proper ventilation or an exhaust fan to prevent overheating.